There’s no change in the couch cushions!! (A lesson in getting small amounts of quick cash)

If you’re like me, there has never been more than a penny lost in your couch cushions, or your pants’ pockets. Maybe this is a common place to find money for some people, but I pretty much always know where cash is (I’m not very good at hiding it from myself to surprise me with later). I’m learning there are a few ways to get a little extra money quick, and they don’t come from the couch. I thought I’d share some of my findings with you followers! Using these tips hopefully you can pick up some extra cash, clean out the attic (or closet), and in general feel very productive. 🙂

One of the ways I recently earned some extra spending money is by taking some clothes I didn’t need to a store called Once Upon A Child. They are a consignment (second-hand) store, that sells gently used children’s items and some maternity wear. Normally they will give you cash for your items but it just so happened that my store was doing only store credit for a month or so. That was FINE WITH ME, because it gave me some money to buy Christina some things, but if ya’ll want the cash don’t worry- normally they will do either! 🙂 P.S. I got almost $10 for the stuff I brought in- I was so happy! They also accept books, toys, clothes…anything child-related! Another place I went to (with not much luck, but I will be trying again) is Plato’s Closet. They sell mainly teen name brand clothing. They will also buy your gently used items, but word to the wise- they were very selective with me. To be fair, they were getting in a lot of stuff. Be prepared- you could win or lose on this one, but it’s still worth it to clear out your closet and maybe get some extra moo-lah in the process! Another way to earn some quick bucks is to offer a very good babysitting deal to your friends who are parents. They could probably use a fun date night without paying an arm and a leg, and if you’re willing to give them a break on the cost, you could have spending money in your hands with the snap of your fingers and the change of a diaper! If you’re up for the challenge, go for it! Your friends will get some husband/wife time, and you will be able to buy _____ (insert item you’ve been wanting) finally!

This next idea works if you’re not so much needing more money, as much as to free up some money that you already have. If I’m needing to free up some cash, my first thing is the grocery budget. Electric bills, heating bills- there’s no way around the amount you have to pay for those, but groceries can be flexible if you’re creative. Think slimming down the grocery shopping list for just one week. That means if you usually get 2 kinds of sodas, get one (or none). If you generally budget a certain amount for fruit, try cutting a couple dollars off of that. You might not eat like a king that week, but you won’t starve and you’ll have a little bit of financial freedom in your wallet! P.S. Now is the time to try out all those budget friendly meals you’ve been putting on Pinterest!

Last but not least, a basic but painfully effective way to earn extra money is to pick up an extra shift. Depending on where you work this is fairly easy. Post a note saying you’re willing to take on any extra shifts (I’d put a cap on the dates that you will do it so you don’t get swamped), or talk it over with your boss and let them know you’re available to pick up shifts. It does mean some extra work, but if you can add a little bit onto your work schedule, it will definitely ease things up financially.

Unfortunately, the age old problem with money is that you have to work for it 😉 But my thoughts are work smart AND hard. Keep saving and be careful where and when you spend. Your hard work will pay off, and hopefully pay a little extra too! 🙂

DIY Project: Pot Rack with Lid Storage

***Today we have a guest post on Young Wife Chronicles (written by my fabulous sister Kimberly!), and she is going to teach us how to do an incredible DIY project for cookware storage! 🙂 I hope we will see many more posts from her in the future!***- Glorianna


Most cookware storage ideas I’ve seen on Pinterest take up valuable cabinet and drawer space in your kitchen, and some even require drilling holes into things that renters aren’t allowed to drill holes in.

So, what if you rent, and you don’t have a whole cabinet to devote to your cookware set?

This wall-mounted pot & lid rack fit my requirements, except it wasn’t quite big enough to fit all my cookware. If you need a custom storage solution for your kitchen, this project isn’t too difficult to make, provided you have the right tools. I’ve never done any kind of woodworking, but with a few basic instructions on how to use the saw, I was able to complete this project in a couple of afternoons. If you can convince someone to take your kid(s) for a day, it can be done a lot quicker than that. 🙂

PicMonkey Collage

Conveniently for me, my dad lives 2 miles away, and his shop is filled with any kind of tool I could ever need. If you don’t have these tools, you probably know someone who does. I would recommend bartering. You give them cookies; they let you use their power tools. Almost no one will say ‘no’ to cookies.

You can customize the materials depending on the look you want, and how much money you have to spend. Use the finest cedar wood and overlay it with gold (not practical, since gold is so heavy), or get free scraps of lumber from Craigslist and let your kid color it with crayons (totally avant-garde). I took the middle of the road, and bought some inexpensive lumber from Lowe’s and used leftover paint from another project. I’m pretty happy with the way it turned out. It’s far from perfect, but it will suit my needs just fine. Since I know I did a bunch of things wrong with this project, this tutorial is more to show you how, by trial-and-error, I completed the project. If you want to know how to do it right, you need advice from someone actually knows what they’re doing! If you are an experienced carpenter or handyman, feel free to laugh at me. 😀

Materials:

  • 2- 1×3″ boards, 6′ long
  • 1- 1×8″ board, 6′ long
  • 10- screw-in cup hooks (like this)
  • 3-  3/8″ dowels, 48″ long
  • screws (I used deck screws that my dad already had. Not sure if they were 2 1/2″ or 3″)
  • paint (leftovers from another project)
  • wood glue
  • wood filler (not needed unless you make extra holes & need to fill them in… Oops!)
  • screw covers or end caps (optional)
 
You will have some leftover wood, but that’s good if you are a n00b like me. You might want some scraps to experiment with, so you don’t ruin your project.

Tools:

  • Circular saw
  • Smaller saw for cutting the dowels
  • Tape measure
  • Quick square
  • Pencil
  • Power screwdriver/drill
  • Screwdriver bit
  • Small drill bit (for predrilling screw holes)
  • 3/8″ Wood drill bit
  • Sandpaper

CAUTION: PLEASE PLEASE PLEASE BE CAREFUL. I googled “circular saw” to get a picture of the saw I used, & I ended up seeing some disturbing pictures of the damage power tools can do to a hand. *shudder* Keep appendages clear of the blades!

Here’s what I did:

1. Sketch out a rough idea of what you want. Make a list & gather all the materials you will need.  For me, it was helpful to wander around the store a little bit, looking for what I needed, so I could see what was available, and how different sizes of boards, dowels, and hooks looked. If you know exactly what you need, online ordering saves a lot of time. Lowe’s & Home Depot both have the option to order online & pick up at your local store.

DSCN1934

2.Measure, and cut your wood.

DSCN1941

For the front piece, and the two back pieces, I measured & cut the 1x3s into three 34″ lengths. Well, they were supposed to all be the same length. I had to cut two of them again, and then sand them down to get them even. Apparently, I don’t know how to operate a tape measure & pencil!DSCN1939

I originally cut the dowel rods to 8″ lengths, but that was way too long & I ended up cutting them down to 4″


DSCN1956

Use the 1×8” board for the two side pieces. 10″ tall on the tall side, 7″ on the shorter side.

DSCN1943

3. Sand the cut edges so it’s all nice and purty.

4. Screw the two 1×8 pieces & the three 1×3 pieces together, BUT WAIT! You need to pre-drill the screw holes on the 1×8 pieces, or your wood might split, like this…

DSCN1942

…and then you might cry (don’t worry, that was extra wood)

DSCN1946

I realized after assembling it, that I needed to move the bottom wall board in from the edge 2″ so the dowel rods would fit. Duh…

DSCN1947


5. Drill out holes for your dowel rods, using a 3/8″ wood drill bit (same size as the dowels). I spaced the holes 2″ in from each side, then 2 1/4″ apart. DSCN1950
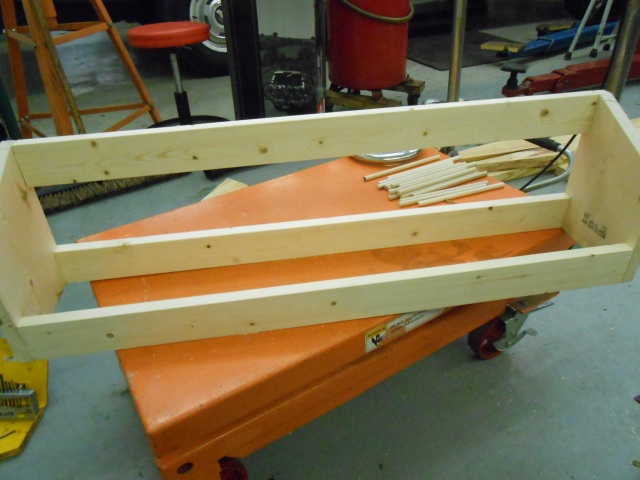
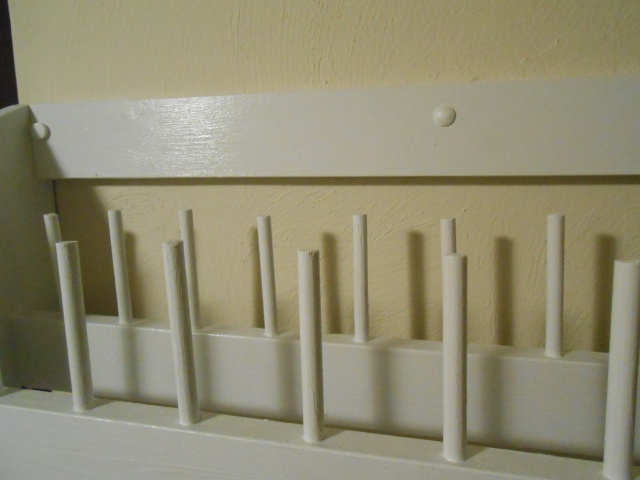
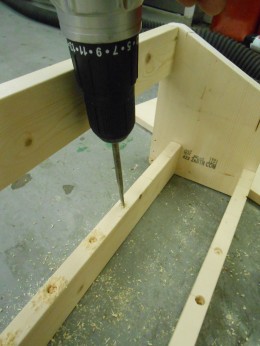
The dowels, and the holes in which they go, all ended up being different lengths and depths (because I’m so good at measuring), so I just mixed and matched them until they all were about the same height (so unprofessional). If you really want them exactly the same height, you can sand them down with sandpaper (unfortunately, I forgot to do that). Use a little wood glue on the ends of the dowels to secure them in place.

DSCN1957

6. Since I drilled a few too many holes, I needed to use some wood filler on the side pieces. Use it like drywall compound: slap it on as smooth as you can, and then, after it dries, sand it until it’s flush with the surface of the wood.

wood filler

7. Paint it! I used some leftover paint that my dad had from a project he just finished.

DSCN1970

8. Now you need to find the studs in the wall where this will be hanging. Mounting it to the drywall isn’t going to cut it, since this will be supporting a LOT of weight. Don’t tell anyone, but, I just guessed where the studs were, then drilled a couple holes until I found them. So wrong… but it worked! Those extra holes are cover by the pot rack, so it doesn’t matter too much. 😉  Mark the spots on the rack where your screws will go, predrill the holes, then mount it to the wall. Don’t forget your screw caps!

DSCN1974

10. Measure & mark  where your hooks need to go (depending on the size, shape and number of pots & pans you have), then screw ’em in!

11. Put away your cookware & rejoice! You now have cabinet space for your other kitchen junk.

12. Take a picture for facebook, of course. 😉

DSCN1977 DSCN1978


Ahhh…. The struggles of feeding a man who never gets full.

To put it gently, my husband could eat a horse. Maybe two horses. Okay, okay- I might be exaggerating a little bit, but you see, where most people choose a recipe that feeds five to actually feed five, I choose a recipe that feeds five to feed me and my sweet (but always hungry husband). As you can imagine, this makes the task of grocery shopping daunting, and if you add on the fact that he dislikes beans and I dislike rice (which are two of the cheapest foods to buy in bulk), it makes it seem downright impossible some days. To the ones who cower at grocery shopping and other household chores however, I say “FEAR NOT!”.

There are some simple tricks that I’ve learned, and although I am still a newbie, I am determined to find ways to cut grocery bills down, eat fairly well and healthy, and not spend the rest of my life “couponing”. I am listing a few of the tricks I’ve found to grocery shopping for you. Most experienced wives/mothers will breeze past these ideas since they’ve already put them into practice long ago, but for the ones who are still on more of a beginner stage, or are in a “money-saving” stage of life, this is for you!

*Tips and tricks to help your wallet survive the trip to the grocery store*

  1. If you’re at Walmart, consider switching to a grocery store like Kroger or Publix. (You can also go to multiple stores, but I find that going to multiple grocery stores unless they are right next to each other is simply not going to happen for me.) Walmart seems like it is cheaper and for certain things it is, but the benefit to other grocery stores are the manager specials, sales on meat (which Walmart never seems to have), and the shoppers cards you can sign up for. These save you WAY more than I ever thought possible, and are totally free.
  2. Get online. Let me use my own experience as an example. I shop at Kroger and every time I would try to use paper coupons, I would forget them, leave them in my purse as I was checking out, or realize I didn’t really need 5 jars of peanut butter to save 50 cents. Once I went to Kroger.com I found they not only had the ad for their grocery store on there, but they also had the option of digital couponing. This way you chose the coupons you wanted, digitally loaded them onto your card, and you’re done!!! No printing out coupons, no fumbling through your purse with the cashier stomping their foot in impatience. You just scan your card when you check out at the grocery store, and all the coupons you found online are added to your receipt! How convenient is that?!
  3. Plan out your meals and write out a shopping list. I can’t stress this enough. Every time I go to the grocery store without a list, I think I need everything. If I write it out first, I not only spend less but I shop a lot quicker!
  4. Budget for incidentals. This one goes along with the previous tip because I for one, KNOW I will spend a few dollars on some fun foods like chips or soda. Instead of planning my shopping trip and then getting through the check out line just to find out *GASP* I’m $10-$20 over-budget, I just plan ahead of time that I will spend a certain amount on those little fun favorites. That way I control myself within that budget without missing out on some delicious treats!
  5. Sides and fillers are your best friends. This may not make sense at first but stay with me. I used to go for ease, which meant one pot, one or two food items…basically as little fuss and mess as possible while still making a good meal. However, times have changed and now saving money trumps saving effort. Your basic fillers are going to be rice, beans, and pasta. Those are things that taste delicious, fill you up, and really stretch your dollar well! Ideas for sides would be bread, salad (if you’re really needing to save money, buy a head of iceberg or romaine lettuce and tear it up yourself instead of buying it pre-washed and bagged), potatoes, and depending on your taste buds, grits.

Okay… that’s it for my tips. Of course there are many more ways to eat well and save well, but for now those are my main points! Be looking for the next installment on Chronicles Of A Young Wife; I will be posting once a week! Post your own money-saving tricks in the comment section and come back soon! I’m off to cook dinner 😉